I had heard a little about Flickr from friends and have seen
a couple albums of their family pictures.
I always just thought it was another one of these photo share sites like
Kodak or shutterfly where you can upload pictures and have them printed or send
albums to friends to view and buy pictures.
After reading Chapter 7, I was pleasantly surprised at some of the
features it has and how it can be used in education. For example, being able to post pictures, share
with people across the globe, and have discussions about them is amazing. As Richardson puts it, it is truly a
"social software" where the contributors interact and share and learn
from each other in creative and interesting ways. Being able to share what your students are
doing in class with their friends and family anywhere would be great. I can also see how it is also a powerful tool
for amateur photojournalists. The story
about all the images collected from Hurricane Katrina was amazing as well. Being able to alter the privacy settings to
whomever you want to view is very important as well, especially when used in
the classroom. I liked what Richardson
says in Chapter 8 about podcasts and how they could help record parts of class
that kids could go back and study or even hear for the first time if they had
to miss class. I could see myself using
this for projects and such that we do in my classroom.
Showing posts with label Screencasts. Show all posts
Showing posts with label Screencasts. Show all posts
Wednesday, May 23, 2012

Tuesday, May 22, 2012
Movie Maker
Chapter 7-8-9 Luis
In the last three chapters that we read, I found chapter 8 to be
more exciting, especially because the author talks about the use of video in
the classroom and how beneficial that can be for students and teachers. As I
was reading the chapter, Richardson had mentioned the use of podcast and videos
that could be used as a way to enhance the learning experience. I had heard and
seen, “podcast” and I had little understanding of what went into it. Of course
everybody has seen videos made by people and posted on the web, and this is
what interested me the most. As I read the chapter the author gave us a few
website to refer to and I decided to check out Window’s Movie Maker. Here is a
demo of how it works.
Saturday, May 19, 2012
Chapter 7 & 8 Response
After reading through chapters 7 and 8, I was left feeling rather overwhelmed by all there is out there for transmitting information. After recording our voice and adding the recording to our PLE, my initial thought was that I wasn't really thrilled with how my recording turned out. We had some technical difficulties at the end, and I was left feeling dissatisfied with my results. I considered taking it off and just re-recording it, but then I remember a reference to Audacity in the chapters. Audacity is a nifty little tool that can edit audio. I had been introduced to it before, but never had the patience to figure it out. So I figured this would be a great topic for my screencast.
The screencast proved to be a whole different challenge, even more difficult than figuring out Audacity. My browser was not cooperating, saying that I needed a Java runtime to use Screencast-o-matic. After a couple hours trying to troubleshoot the issue, I resorted to using Quicktime which proved to be very easy. We are so fortunate to have so many options out there for the same project. Unfortunately I had to take multiple takes, but I think what I ended up with works for the purpose of this assignment.
Screencasting is such a great tool and I could see using it to help explain homework on my website for my students or giving parents a guided tour of useful websites on the internet. The more I play with these tools in class, the more I can see how they can be used in education. It's easy to ignore the technology that is out there, but honestly, the more we use it and the more our students use it, the better prepared they will be in the real world.
Shane
Robinson
Create a screen cast as your review/post
for chapters 7 & 8, audio included.
·
Two minute example that relates
to one of the topics in chapter 7 or 8
·
Post it to the class blog page
using the new post tab in the top right hand corner of the class web blog.
Ch. 8 Screencasting
Outline of a script and steps to be taken to create a screencast via Jingproject.com
How to set up and use a screencast via
Jingproject.com
One of the easiest pieces
of software per Richardson, not from my experience!
I have chosen to create my
screencast of setting up and using Jing to expose classmates to this screencast
version as opposed to screenocast which we are all required to create an
account for already. This way you can judge if you like it better than
screen-o-matic without having to set up an account with Jing account.
1.
I will go to my address bar and
enter Jingproject.com
2.
I have to download the software
which takes only a couple of minutes(five times at least).
3.
I go to the tab PRODUCTs
4.
Click on free account
5.
Provide an e-mail account,
password, screen name, click on sign up tab
6.
Go to my own e-mail address to
confirm and activate my screencast page
7.
It will take you to your
screencast page and have you put in your password
8.
You will be shown a quick video
tutorial of how to use screencast
9.
Upload content of videos
preferably go to Bottles for Bowmen and Kans for Kenya folder
10.
Sharing this content with
others
11.
Place your icon over the video
and click on the three arrows (share content).
12.
Sharing the url is the easiest
13.
Copy and paste this url into an
email
14.
Just as a heads up any content
left in your root library page is open to the public so learning how to manage
this web site and compartmentalize content is crucial.
15.
Create some folders and set
privacy levels
16.
Give you folder a name and then
check out the privacy settings tab
17.
Hidden is you most practical
choice
18.
Click save
19.
Run into trouble check out the
help center tab
So my plan was to use my already existing Screencast-O-Matic account to provide a screencast tutorial on
how to use Jingproject.com per our text. My goal was to show how to
create and use a jing version of screencast. What I learned is that
Jingproject.com is nothing like the text describes. When I typed jingproject.com into my address
bar it actually took me t to http://www.techsmith.com/jing.
With no success on screencast.com which is
in the techsmith.com page which is supposed to be jingproject.com according to
the text, I moved on to Screencast-O-Matic . Screen-O-matic seems easy as all I
should have to do is click the tab: Start Recording since I already set up and an account and was logged in but when I do, it has a pop
up asking me to install Java plug in. I have installed it on five separate
attempts to no avail. When I do press Start Recording it states starting up but
then never does. Every step leads to a dead end. This should not be this
difficult but this is where I am at. Creating a screencast is apparently more elusive
than the text states no matter what version I try to use. I hope my classmates are having better luck than I.
Thursday, May 17, 2012
Anita models screencast chapter response
Click on the the screencast on the left to get an overview of how to create your Screencast Chapter Response for this week.
My Chapter 7&8 Highlights
My Chapter 7&8 Highlights
As I mentioned in class there
are a number of tools available on the Web that do similar functions. My experience is that there is usually a common function
provided by all, but then each application will have a certain unique feature
or attribute. For
this course I chose quick, easy access tools to try and demonstrate how simple
it can be to start exploring some of these in practice.
Photo Sharing
Tools like Flickr and Google's version Picasa, allow you to upload photos and share them via the Web using a variety of mobile devices. As we already have Google account through Boxer we will explore Picasa which has similar to features to other photo sharing apps. Picasa: https://picasaweb.google.com/home
Podcasting
Simply put, podcasting is a digital audio file in an mp3 format. To create a podcast you need a digital audio recorder, server space to host the file, something to say, and time to prepare it. You can find a range of tools, some with editing capabilities to create state-of-the-art podcasts. The tool we will be using is podomatic at http://www.podomatic.com/login
Tools like Flickr and Google's version Picasa, allow you to upload photos and share them via the Web using a variety of mobile devices. As we already have Google account through Boxer we will explore Picasa which has similar to features to other photo sharing apps. Picasa: https://picasaweb.google.com/home
Podcasting
Simply put, podcasting is a digital audio file in an mp3 format. To create a podcast you need a digital audio recorder, server space to host the file, something to say, and time to prepare it. You can find a range of tools, some with editing capabilities to create state-of-the-art podcasts. The tool we will be using is podomatic at http://www.podomatic.com/login
 Screencasting
 One step up from podcasting, is capturing what you are doing on your computer while adding audio narration. Richardson's example in the chapter provides a good overview http://jonudell.net/udell/gems/umlaut/umlaut.html
There are many exciting
ways to integrate this tool into educational practice and a number of tools to achieve
this – e.g. Jing, Camtasia. The tool we will be using, is screencast-o-matic http://www.screencast-o-matic.com/screen_recorder
Resource reviewed http://www.khanacademy.org/Some other Screencasting Tips
 Once you are ready to record your screencast, click on Red button to start session on the screencast tool bar. Click Done when you are finished.
From here you will be prompted through a few windows to add your YouTube account so that Screen-o-matic can upload your screencast to You Tube.


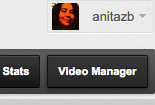 When the screencast has been processed, you will need to go to your You Tube page by clicking on My Channel. On this page you will see the Video Manager button on the top right fo the screen. This will show a list of all of your videos.
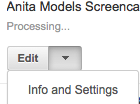 From there you can select the uploaded screencast and use the Edit drop down to get to Info and Settings.
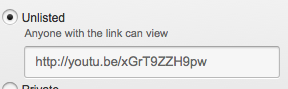 Here you will see the option to select Unlisted - Anyone with the link can view.
 Position your cursor, then click on the little black icon in the WYSIWYG toolbar to Insert a Video. You will then be presented with options for selecting a file and can go directly to My YouTube videos.
Hope that helps, and have fun!
Subscribe to:
Posts (Atom)